2009年8月27日 星期四

如何在C#中使用Unmanaged dll

C#中可以透過PInvoke(Platform Invocation Services), 呼叫 DLL 內實作的Unmanaged函式,
其流程可以參考 MSDN - PInvok的流程圖

Managed的程式中使用Unmanaged dll的方法有兩種:
  • 呼叫DLL匯出(dllexport)的函式
  • 呼叫COM元件上的介面
因為, 使用COM Interop的方式有點複雜, 所以本文章只介紹第一種方法, 若要使用匯出的 DLL 函式(C-Style function), 可分成下面幾個步驟:
  • 引用DllImport所在的名子空間: using System.Runtime.InteropServices;
  • 定義類別(例如class PlatformInvoke)包裝要被呼叫的DLL介面(也就是C/C++中的header檔)
  • 使用 DllImport來引用DLL的函式, 並用 staticextern 來標記函式. 此目的在告訴編譯器該方法與實體物件無關.
DllImport的格式語法如下:
//將user32.dll換成要使用的DLL檔 
[DllImport("user32.dll"), SetLastError = true]

//換成所需的方法及參數(需要將Unmanaged類型轉成Managed)
public static extern ReturnType FunctionName(type arg);
如下面範例所示:
using System;
using System.Runtime.InteropServices;

class WrapperTest
{
    [DllImport("msvcrt.dll")]
    public static extern int puts(string c);

    [DllImport("msvcrt.dll")] 
    publlic static extern int _flushall();

    public static void Main() 
    {
        puts("Test");
        _flushall();
    }
}


下面表格列出DllImport的屬性欄位

名稱說明
BestFitMapping將 Unicode 字元轉換成 ANSI 字元時, 設定true/false可啟用或停用自動對應行為
CallingConventionCallingConvention 列舉成員, 此欄位的預設值為 WinAPI
CharSet指示用在入口處中的字串參數, 如果未指定 CharSet, 則預設為 CharSet.Auto
EntryPoint指示要呼叫的 DLL 進入點(Entry Point) 的名稱或序數
ExactSpelling控制 DllImportAttribute CharSet 欄位是否會導致 Common Language Runtime 搜尋 Unmanaged DLL 以取得不是指定名稱的進入點名稱.
PreserveSig指定簽章是否為 Unmanaged 程式碼進入點的直接轉譯, 預設此欄位為 true
SetLasrError指示自屬性方法傳回之前, 被呼叫端是否呼叫 SetLastError Win32 API 函式。
ThrowOnUnmappableChar在無法對應的 Unicode 字元轉換為 ANSI "?" 字元時, 啟用或停用例外狀況的擲回

  • Managed 資料型別代替 Unmanaged 資料型別
Managed需要封裝Unmanaged的資料, 下面表格列出UnmanagedManaged的資料型態轉換:
Wtypes.h 中的 Unmanaged 型別Unmanaged C 語言型別Managed 類別名稱
HANALEvoid*System.IntPtr
BYTEunsigned charSystem.Byte
SHORTshortSystem.Int16
WORDunsigned shortSystem.UInt16
INTintSystem.Int32
UINTunsigned intSystem.UInt32
LONGlongSystem.Int32
BOOLlongSystem.Int32
DWORDunsigned longSystem.UInt32
ULONGunsigned longSystem.UInt32
CHARcharSystem.Char
LPSTRchar*System.String 或
System.Text.StringBuilder
LPCSTRConst char*System.String 或
System.Text.StringBuilder
LPWSTRwchar_t*System.String 或
System.Text.StringBuilder
LPCWSTRConst wchar_t*System.String 或
System.Text.StringBuilder
FLOATFloatSystem.Single
DOUBLEDoubleSystem.Double


如果要包裝一個資料結構,
在 C# 中可以使用 StructLayout屬性來表示的結構, 如下面範例說明:

CC#

struct tOTM_Point
{
int X;

int Y;

int R;

};


[Serializable, StructLayout(LayoutKind.Sequential)]
public struct tOTM_Point
{

public int X;

public int Y;

public int R;

}

如果在Struct中有Array的型態, 可以利用MarshalAs 屬性來表示, 如下所示

CC#

struct tOTM_Touch
{
int TouchType;

int TouchState;

tOTM_Point PointArray[2];

};


[Serializable, StructLayout(LayoutKind.Sequential)]
public struct tOTM_Touch
{

public tOTM_TouchType TouchType;

public tOTM_TouchState TouchState;


[MarshalAs(UnmanagedType.ByValArray, SizeConst = 2)]
public tOTM_Point[] PointArray;

};


下面我以一個用C寫的OTMUT.dll為例子, 說明如何將Unmanaged dll轉成Managed程式碼:


C
#ifdef  OTMUT_EXPORTS
#define OTMUT_API __declspec(dllexport)
#else
#define OTMUT_API __declspec(dllimport)
#endif


struct tOTM_Point
{
int X;

int Y;

int R;
};

struct tOTM_Touch
{
int TouchType;

int TouchState;

tOTM_Point PointArray[2];
};

typedef void (_stdcall* TouchFunc) (tOTM_Touch Touch);

OTMUT_API void RegisterTouchFunc(TouchFunc Func);


C#
using System;
using System.Runtime.InteropServices;


namespace OTMUTInterop
{
[Serializable,
StructLayout(LayoutKind.Sequential)]
public struct tOTM_Point
{   
public int X;

public int Y;

public int R;

};

[Serializable,
StructLayout(LayoutKind.Sequential)]
public struct tOTM_Touch
{    
public tOTM_TouchType TouchType;

public tOTM_TouchState TouchState;

[MarshalAs(UnmanagedType.ByValArray,
SizeConst = 2)]
public tOTM_Point[] PointArray;

};

delegate void
TouchFunc(tOTM_Touch touch);

class OTMUT
{       
[DllImport("OTMUT.dll",
CallingConvention =
CallingConvention.StdCall)]
public static extern void
RegisterTouchFunc(TouchFunc func);

}
}


參考文章 :
MSDN -
使用 Unmanaged DLL 函式
MSDN - 使用平台叫用封送處理資料

2009年8月23日 星期日

C#型別轉換(Casting) - as運算子

當你在C#中作型別轉換時, 可以利用強制轉換的方法, 例如:

double dx = 7.3;
int i = (int) dx;


下面的範例中, 我們在一個控制項(ListBox)的選擇項目事件變更時, 將object(sender)轉型為 ListView.


void ONListBoxSelectinChange(object sender, SelectionChangedEventArgs args)
{
// 將object轉型為ListView
ListView lstView = (ListView)sender;
int TotalCount = lstView.Items.Count;
}
不過當轉型失敗時, 會造成程式當掉, 因此你必須使用trycatch來處理例外錯誤(系統會丟出InvalidCastException例外狀況)

void ONListBoxSelectinChange(object sender, SelectionChangedEventArgs args)
{
try
{
ListView lstView = (ListView)sender;
int TotalCount = lstView.Items.Count;
}
catch (InvalidCastException e)
{
MessageBox.Show(e.Message);
}
}


[圖 1] 使用try catch丟出的例外錯誤


而在C#中提供一個比較簡單的方法, 就是使用as運算子, 這樣作會更有效率也很安全, 如果轉型失敗的話, 它會返回null, 因此, 你可以很容易的來作一些判斷, 如下面的範例所示:


void ONListBoxSelectinChange(object sender, SelectionChangedEventArgs args)
{
ListView lstView = sender as ListView;

if (lstView == null)
{
MessageBox.Show("Could not convert object to ListView");
}
else
{
int TotalCount = lstView.Items.Count;
}
}

參考資料:
HOW TO:使用 as 和 is 運算子進行安全轉型 (C# 程式設計手冊)
Effective c# Item3:運算子is或as優於强制轉型

2009年8月19日 星期三

WPF ListBox - Beginning


ListBox
可以讓使用者能夠從清單選取某個項目, 它是一個項目的控制項, 可以包含物件(object)的集合.

ListBox繼承自ItemControl, 它可以透過Items(型別為object collection)和 ItemsSource(有實踐IEnumerable的物件)這兩個屬性 , 來將任何物件放入ListBox, 如果放入的項目不是UIElement(例如:數值或string), 則會呼叫物件的ToString()函式, 然後將資料放入TextBlock中.

將物件放入
ListBox有兩種方法:
  • 利用Items屬性加入項目(Add)
下面的程式碼說明利用Items將任一物件放到ListBox中:

XAML檔如下:

<Window
x:Class="ListBoxTemplate.Window1"
xmlns="http://schemas.microsoft.com/winfx/2006/xaml/presentation"
xmlns:x="http://schemas.microsoft.com/winfx/2006/xaml"
xmlns:sys="clr-namespace:System;assembly=mscorlib"
Title="ListBox" Height="300" Width="300">
<Grid>
<ListBox Margin="10" Name="listBox1">

<ListBoxItem Foreground="Aqua">Text</ListBoxItem>

<ListBoxItem>
<sys:DateTime>8/20/2009</sys:DateTime>
</ListBoxItem>

<ListBoxItem>
<Button Content="Button"
Background="LavenderBlush"
Foreground="Green"
Width="60"
Height="30"/>
</ListBoxItem>

<ListBoxItem>
<StackPanel>
<Rectangle Width="50"
Height="50"
Fill="Chartreuse"
Stroke="LightSlateGray"
StrokeThickness="3"/>
<TextBlock Text="Multiple objects in Panel"
FontSize="16"
Foreground="Red"/>
</StackPanel>
</ListBoxItem>
</ListBox>
</Grid>
</Window>

C#檔如下:

Grid grid = new Grid();
ListBox listBox1 = new ListBox();
listBox1.Margin = new Thickness(10);

grid.Children.Add(listBox1);

// Add a string object to a ListBox.
listBox1.Items.Add("Text");

// Add a DateTime object to a ListBox
DateTime dateTime = new DateTime(2009, 8, 20);
listBox1.Items.Add(dateTime);

// Add a button object to a ListBox
Button button1 = new Button();
button1.Content = "Button";
button1.Background = Brushes.LavenderBlush;
button1.Foreground = Brushes.Green;
button1.Width = 60;
button1.Height = 30;
listBox1.Items.Add(button1);

// Add a stackpanel that contains multpile objects to the ListBox.
StackPanel panel = new StackPanel();

Rectangle rect = new Rectangle();
rect.Width = 50;
rect.Height = 50;
rect.Fill = Brushes.Chartreuse;
rect.Stroke = Brushes.LightSlateGray;
rect.StrokeThickness = 3;

TextBlock txtBlock = new TextBlock();
txtBlock.Text = "Multiple objects in Panel";
txtBlock.FontSize = 16;
txtBlock.Foreground = Brushes.Red;

panel.Children.Add(rect);
panel.Children.Add(txtBlock);
listBox1.Items.Add(panel);

this.AddChild(grid);


[圖 1] 利用Items加物件

  • ItemsSource 繫結到一個物件的集合
你可以ItemsSource等於一個物件的集合, 或是將ItemsSource繫結(Binding)至集合物件,
注意: 當設定ItemsSource 屬性設定時, 會將 Items 集合設為唯讀和固定大小, 因此不能再對Items作新增或移除. 若將ItemsSource 屬性設為 null, 則會移除集合, 並將用法還原為 Items.

下面的範例說明, 如何利用ItemSourceBinding一個物件:
首先, 我們先建立一個
WeekData 的物件,如下:

 public class WeekData : ObservableCollection<string>
{
public WeekData()
{
Add("Sun");
Add("Mon");
Add("Tue");
Add("Wed");
Add("Thu");
Add("Fri");
Add("Sat");
}
}

ItemsSource 繫結至 WeekData:

Grid grid = new Grid();
ListBox listBox = new ListBox();
WeekData weekData = new WeekData();
Binding binding = new Binding();

binding.Source = weekData;
listBox.SetBinding(ListBox.ItemsSourceProperty, binding);
grid.Children.Add(listBox);
this.AddChild(grid);

如果您想要從 XAML中 繫結的CLR物件, 可以將物件定義為資源, 並指定x:Key,如下所示:

<Window.Resources>
<c:WeekData x:Key="weekData"/>
</Window.Resources>

<ListBox ItemsSource="{Binding Source={StaticResource weekData}}"/>


[圖 2] 利用ItemSource加入物件

參考文件:
MSDN-
Controls 內容模型概觀
MSDN- ListBox Class

2009年8月16日 星期日

如何在應用程式中分辨Mouse或Touch事件?

Windows 7的視窗應程式中, 不論你用mouse或是touch作click的動作, 應用程式都會收到WM_LBUTTONDOWNWM_LBUTTONUP事件. 如下面的Win32視窗程式所示,當收到滑鼠左鍵按下/放開的訊息時, 會跳出一個訊息視窗.

case WM_LBUTTONDOWN:
{

MessageBoxA(NULL, "Mouse left button down",0,0);    

};
break;

case WM_LBUTTONUP:
{

MessageBoxA(NULL, "Mouse left button up",0,0);

};
break;


                                                   [圖 1]滑鼠左鍵按下/放開


                                                       [圖 2]Touch下去/起來

從上面的圖示中看到, 不論你是用mousetouch作click, 都會收到滑鼠左鍵按下/放開的事件; 但是開發觸控應用程式時, 可能需要分辨出使用者是利用滑鼠作點擊(click), 還是利用手指作觸碰, 來作不同的設定. 因此, 我們可以在收到WM_LBUTTONDOWNWM_LBUTTONUP 時, 呼叫GetMessageExtraInfo()來判斷滑鼠事件是來自touch還是mouse, 程式碼如下所示:

1. 定義滑鼠事件來自touch的訊息, 如下所示:
#define MOUSEEVENTF_FORMTOUCH 0xFF515700


2. 利用GetMessageExtraInfo函式作判斷, 如下所示:

case WM_LBUTTONDOWN:
{
if((GetMessageExtraInfo() & MOUSEEVENTF_FORMTOUCH)
== MOUSEEVENTF_FORMTOUCH)
{
MessageBoxA(NULL, "Click was generated by Touch",0,0);
}
else
{
MessageBoxA(NULL, "Click was generated by Mouse Click",0,0);
}

};
break;

case WM_LBUTTONUP:
{
if((GetMessageExtraInfo() & MOUSEEVENTF_FORMTOUCH)
== MOUSEEVENTF_FORMTOUCH)
{
MessageBoxA(NULL, "Click was generated by Touch",0,0);
}
else
{
MessageBoxA(NULL, "Click was generated by Mouse Click",0,0);
}
};
break;


結果如下面圖示:


                                                       [圖 3]滑鼠左鍵按下/放開


                                                          [圖 4] Touch下去/起來

2009年8月14日 星期五

WPF 面板 - Grid

Grid是很常見的容器(container), 它可以用來作UI layout, 它的功能類似HTML中的Table,可定義表格的直行與橫列.

如果你想要製定一個3x3的表格(三直行+三橫列), 寫法如下面程式碼(XAML檔和C#)所示:


XAML:
<Grid ShowGridLines="True" Name="grid">
<Grid.ColumnDefinitions>
<ColumnDefinition/>
<ColumnDefinition/>
<ColumnDefinition/>
</Grid.ColumnDefinitions>

<Grid.RowDefinitions>
<RowDefinition/>
<RowDefinition/>
<RowDefinition/>
</Grid.RowDefinitions>
</Grid>

C#
public GridWindow()
{
InitializeComponent();

Grid grid1 = new Grid();
grid1.ShowGridLines = true;

for (int i = 0; i < 3; i++)
{
ColumnDefinition colDef = new ColumnDefinition();
RowDefinition rowDef = new RowDefinition();

grid1.ColumnDefinitions.Add(colDef);
grid1.RowDefinitions.Add(rowDef);
}

this.AddChild(grid1);
}

在此範例中, 我們可以讓ShowGridLines = true以顯示格子之間的線, 方便作Debug用.


[圖 1] 3X3 Grid


GridUnitType可用來設定尺寸單位的類型, 你可以搭配GridLength()來指定指定行和列的大小,其成員如下:


  • Pixel - 固定大小
example:
RowDefinition rowDef = new RowDefinition();
rowDef.Height = new GridLength(50, GridUnitType.Pixel)


  • Auto - 根據Content(內容)來設定大小
example:
RowDefinition rowDef = new RowDefinition();
rowDef.Height =
GridLength.Auto;


  • Star - 分攤剩下的空間
example:
RowDefinition rowDef = new RowDefinition();
rowDef.Height = new GridLength(33, GridUnitType.Star) ;


如果你想要把控制項塞到Grid裡面, 可以使用SetRowSetColumn方法, 指定row和column的index(從0開始), 來表式控制項擺放的位置.

example:
Grid.SetRow(control, 1);
Grid.SetColumn(control, 2);

你也可以使用SetRowSpanSetColumn的方法, 指定要跨列和行的個數.

example:
Grid.SetRowSpan(control, 3);
Grid.SetColumnSpan(control, 3);


下面的範例, 我們將示範如何將控制項放入
3X3的Grid 中, 然後適當調整Grid行和列的大小, 畫面如下所示:


[圖 2] Number Grid

Grid的第一列中, 我們會放一個內容為"Number Grid"TextBox,
TextBox會橫跨3行, 列的高度會設為Auto.

然後, 我們在Grid其他的cell中各填入一個數字Button, 其程式碼如下所示:


XAML
<Grid Name="grid1">
<Grid.RowDefinitions>
<RowDefinition Height="Auto"/>
<RowDefinition Height="*"/>
</Grid.RowDefinitions>

<Grid.ColumnDefinitions>
<ColumnDefinition/>
<ColumnDefinition/>
<ColumnDefinition/>
</Grid.ColumnDefinitions>

<TextBox Name="txbBox"
FontSize="25"
Background="BurlyWood"
Foreground="DarkGreen"
Text="Number Grid"

HorizontalContentAlignment
="Center"

Grid.Row="0"
Grid.Column="0"
Grid.ColumnSpan="3">
</TextBox>

<Button
FontSize="30"
Name="button1"
Grid.Row="1"
Grid.Column="0">1
</Button>

<Button
FontSize="30"
Name="button2"
Grid.Row="1"
Grid.Column="1">2
</Button>

<Button
FontSize="30"
Name="button3"
Grid.Row="1"
Grid.Column="2">3
</Button>

<Button
FontSize="30"
Name="button4"
Grid.Row="2"
Grid.Column="0">4
</Button>

<Button
FontSize="30"
Name="button5"
Grid.Row="2"
Grid.Column="1">5
</Button>

<Button
FontSize="30"
Name="button6"
Grid.Row="2"
Grid.Column="2">6
</Button>
</Grid>

C#
public GridWindow()
{
InitializeComponent();

Grid grid1 = new Grid();

for (int i = 0; i < 3; i++)
{                 
RowDefinition rowDef =
new RowDefinition();

ColumnDefinition colDef =
new ColumnDefinition();

if( i == 0)
rowDef.Height = GridLength.Auto;
else
rowDef.Height =
new GridLength(1, GridUnitType.Star);

grid1.ColumnDefinitions.Add(colDef);
grid1.RowDefinitions.Add(rowDef);
}

this.AddChild(grid1);


// Add a TexBox
TextBox txbBox = new TextBox();
txbBox.FontSize = 25;
txbBox.Background = Brushes.BurlyWood;
txbBox.Foreground = Brushes.DarkGreen;
txbBox.Text = "Number Grid";

txbBox.HorizontalContentAlignment =
HorizontalAlignment.Center;

grid1.Children.Add(txbBox);
Grid.SetRow(txbBox, 0);
Grid.SetColumn(txbBox , 0);
Grid.SetColumnSpan(txbBox, 3);

// Add button1
Button button1 = new Button();
button1.FontSize = 30;
button1.Content = "1";
grid1.Children.Add(button1);
Grid.SetRow(button1, 1);
Grid.SetColumn(button1, 0);

// Add button2
Button button2 = new Button();
button2.FontSize = 30;
button2.Content = "2";
grid1.Children.Add(button2);
Grid.SetRow(button2, 1);
Grid.SetColumn(button2, 1);

// Add button3
Button button3 = new Button();
button3.FontSize = 30;
button3.Content = "3";
grid1.Children.Add(button3);
Grid.SetRow(button3, 1);
Grid.SetColumn(button3, 2);


// Add button4
Button button4 = new Button();
button4.FontSize = 30;
button4.Content = "4";
grid1.Children.Add(button4);
Grid.SetRow(button4, 2);
Grid.SetColumn(button4, 0);

// Add button5
Button button5 = new Button();
button5.FontSize = 30;
button5.Content = "5";
grid1.Children.Add(button5);
Grid.SetRow(button5, 2);
Grid.SetColumn(button5, 1);

// Add button6
Button button6 = new Button();
button6.FontSize = 30;
button6.Content = "6";
grid1.Children.Add(button6);
Grid.SetRow(button6, 2);
Grid.SetColumn(button6, 2);
}


參考資料:
MSDN- Grid 類別
WPF Tutorial - Grid

2009年8月10日 星期一

Multi-Touch Application - Photo Viewer

之前的文章有提到 WPF提供2D Transform的功能, 而這樣的功能很適合發展應用程式的手勢(Gesture)操控, 下面, 我就舉一個簡單的圖片瀏覽應用程式, 透過一些手勢操作, 來對圖片進行放大, 縮小, 旋轉, 翻轉和平移.

環境設定:
以下是我的環境設定:

  • 觸控裝置 - Quanta Optical Touch Monitor
  • Touch API - OTMUT(Optical Touch Monitor Utility Toolkit), 這隻Touch API是我們自行撰寫的dll, 主要用來取得觸控點和手勢的資料, 功能類似Windows 7 Touch SDK
當然, 你也可以自行使用一台具有觸控功能的電腦或螢幕, 然後搭配Windows 7 Touch SDK 來開發此程式.

視窗和控制項的設定:

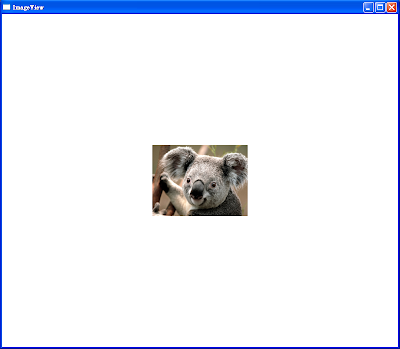
開啟一個WPF專案, 然後從Toolbox中將一個Image的控制項拉到視窗中, 如下圖所示:


[圖 1] 新增Image control

在專案中新增一個Image的資料夾,並把要顯示圖片放進去, 然後在XAML檔中設定圖片的路徑, 如下所示:


[圖2] 設定圖片路徑
<Grid Background="Beige">
<Image Margin="150"
Name="image1"
Stretch="Fill"
Source="Image\Koala.jpg">

</Image>
</Grid>


設定Image 2D Transform:

我們在XAML檔中, 先設定ImageRotaeTransform, ScaleTransformTranslateTransform, 程式碼如下所示:

<Grid Background="Beige">
<Image Margin="150" Name="image1"
Stretch="Fill"
Source="Image\Koala.jpg"
RenderTransformOrigin=".5,.5">
<Image.RenderTransform>
<TransformGroup>
<RotateTransform x:Name="_rotate" Angle="0">
</RotateTransform>

<ScaleTransform x:Name="_scale"
ScaleX="1"
ScaleY="1">    
</ScaleTransform>

<TranslateTransform x:Name="_translate"
X="0"
Y="0">                        
</TranslateTransform>
</TransformGroup>
</Image.RenderTransform>
</Image>
</Grid>


Gesture Function:
我們在.cs檔中加入OTMUT 的 callback function, 當有偵測到Zoom In/Out, Rotate和 Pan手勢作用時, 則對圖片作transform, 如下所示:
void GestureFunction(tOTM_Gesture gesture)
{
double k;

switch (gesture.GestureType)
{
// Detect Pan gesture
case (int)tOTM_GestureType.OTM_GT_PAN:
{
// Display gesture type in console mode
System.Console.WriteLine("Pan");


if (gesture.GestureState == (int)tOTM_GestureState.OTM_GS_BEGIN)
{
g_FirstX = gesture.ActivePoint.X;
g_FirstY = gesture.ActivePoint.Y;
}
else
{
g_SecondX = gesture.ActivePoint.X;
g_SecondY = gesture.ActivePoint.Y;


// translate the image
_translate.X += g_SecondX - g_FirstX;
_translate.Y += g_SecondY - g_FirstY;


// We have to copy second point into first one to prepare
// for next pan message.
g_FirstX = g_SecondX;
g_FirstY = g_SecondY;
}

};
break;

// Detect zoom gesture
case (int)tOTM_GestureType.OTM_GT_ZOOM:
{
// Display gesture type in console mode
System.Console.WriteLine("Zoom");

if (gesture.GestureState == (int)tOTM_GestureState.OTM_GS_BEGIN)
{
g_bBeginZoom = true;
}
else if (gesture.GestureState == (int)tOTM_GestureState.OTM_GS_INERTIA)
{
if (g_bBeginZoom)
{
g_fGEArguments = gesture.Argument1;
g_bBeginZoom = false;
}
else
{
k = (double)gesture.Argument1 / g_fGEArguments;

// Zoom in/out the image
_scale.ScaleX *= (float)k;
_scale.ScaleY *= (float)k;
}
g_fGEArguments = gesture.Argument1;
}

};
break;

// Detect rotate gesture
case (int)tOTM_GestureType.OTM_GT_ROTATE:
{

// Display gesture type in console mode
System.Console.WriteLine("Rotate");

if (gesture.GestureState == (int)tOTM_GestureState.OTM_GS_BEGIN)
{
g_bBeginRotate = true;
}
else
{
if (g_bBeginRotate)
{
_rotate.Angle = gesture.Argument1;
}
else
{
k = (float)(gesture.Argument1 - g_fGEArguments);

// Rotate the image
_rotate.Angle += k;

}
g_fGEArguments = gesture.Argument1;
}
};
break;

// Detect the Press and Tap
case (int)tOTM_GestureType.OTM_GT_PRESS_TAP:
{
// Display gesture type in console mode
System.Console.WriteLine("Press and Tap");

// Flip the image
_scale.ScaleX *= -1;
};
break;

default:
break;
}
}

下面為程式的demo結果


[圖3] 初始畫面


[圖4] 縮小


[圖5] 放大


[圖6] 旋轉


[圖7] 平移


[圖7] 翻轉


2009年8月9日 星期日

WPF 面板 - Layout Properties

UI設計時必須考慮控制項的位置,大小和排列(有不同的面板配置), 來作版面配置(Layout), 版面配置還必須根據視窗大小不同, 而作相對的改變, 因此, 我們先來了解版面配置的一些基本屬性:

這篇文章先說明子控制項常見的版面配置方式:

  • Width and Height - 控制項的寬和高, 如果設成Auto的話, 它們的值會變成Double.NaN, 這時後你就必須透過 ActualHeightActualWidth(唯讀屬性)來取得畫面配置後的高和寬. 注意: Width / Height的值是可以改變的, 但ActualHeight / ActualWidth是不行的.

  • MinWidth, MaxWidth, MinHeight, and MaxHeight -控制項的最小/最大寬和高; 注意: 如果你同時在元件中設定了Height, ActualHeight, MinHeightMaxHeight, 如果Height落在MinHeightMaxHeight 之間, Height的優先權為最高, 但是如果衝突發生時, 它們的優先順序如下(Width屬性一樣):MinHeight > MaxHeight > Height > ActualHeight
  • HorizontalAlignment and VerticalAlignment - 子項目相對於母容器的水平和垂直對齊(例如, Button在StackPanel中的水平或垂直對齊); HorizontalAlignment對齊的方式可分成: Left, Center, Right, Sretch(子控制項會延伸填滿母容器的配置版面空間). VerticalAlignment對齊方式為: Top, Center, Bottom ,Stretch; 注意:Stretch為預設值, 如果有設定WidthHeight, 則以WidthHeight值為優先, 下面為HorizontalAlignment 範例說明:

<Border Background="LightBlue"
BorderBrush="Black"
BorderThickness="2"
Padding="15">
<StackPanel Background="White"
HorizontalAlignment="Center"
VerticalAlignment="Top">
<TextBlock Margin="5,0,5,30"
FontSize="20"
Foreground="Red"
VerticalAlignment="Top"
HorizontalAlignment="Center">
HorizontalAlignment Sample
</TextBlock>
<Button Background="Gold"
HorizontalAlignment="Center"
Margin="10">Left</Button>
<Button Background="LightGreen"
HorizontalAlignment="Right">Right</Button>
<Button Background="Honeydew"
HorizontalAlignment="Center">Center</Button>
<Button Background="Ivory"
HorizontalAlignment="Stretch">Stretch</Button>
</StackPanel>
</Border>

結果如圖示:


[圖1] HorizontalAlignment Sample

  • Margin - 控制元素外的邊界的大小. 例如 Margin="0,10,5,25"(邊界順序為, 左, 上,右,下); 或是寫成Margin="10" 來設定成均等邊界,正確使用Margin可以精確控制項目的呈現位置.
  • Padding- 控制元素邊界內的大小
下面為MarignPadding的範例說明:

首先, 我們拉出一個StackPanel, 然後塞入四個button, XAML檔和畫面如下:

<StackPanel>
<Button Name="button1"
Background="AliceBlue">Button
</Button>

<Button Name="button2"
Background="Beige">Button 2
</Button>

<Button Name="button3"
Background="Pink">Button 3
</Button>

<Button Name="button4"
Background="LightGreen">Button 4
</Button>
</StackPanel>


[圖2] 沒有Margin和Padding

然後, 我們在每個button的屬性中加入 Margin = "10", 可以看到下面的畫面中, button和其他項目有對應的邊界.

<Button Name="button1"
Background="AliceBlue"
Height="40"
Margin="10">Button
</Button>


[圖3] Margin Sample

然後, 我們再把Margin屬性換為Padding = "10", 可以看到下面的畫面, 每個button content的內邊界都作增加.

<Button Name="button1"
Background="AliceBlue"
Height="40"
Padding="10">Button
</Button>


[圖4] Padding Sample
  • HorizontalContentAlignment and VerticalContentAlignment - 除了控制項可以作水平或垂直對齊外, 控制項的內容也有這樣的對齊方式, 請看下面範例和圖示.

<StackPanel>
<Button Name="button1"
Background="AliceBlue"
Height="40"
HorizontalContentAlignment="Left">Button
</Button>

<Button Name="button2"
Background="Beige"
Height="40"
HorizontalContentAlignment="Right">Button 2
</Button>

<Button Name="button3"
Background="Pink"
Height="40"
VerticalContentAlignment="Top">Button 3
</Button>

<Button Name="button4"
Background="LightGreen"
Height="40"
VerticalContentAlignment="Bottom">Button 4
</Button>
</StackPanel>


[圖5] HorizontalContentAlignment Sample

2009年8月3日 星期一

WPF功能 - 3D 繪圖

3D繪圖是WPF的特色之一, 利用WPF提供的3D功能, 你可以在應用程式中製做出很棒3D特效.
下面會先介紹WPF 3D繪圖的基本概念, 並且以3D Cube的範例作為說明.


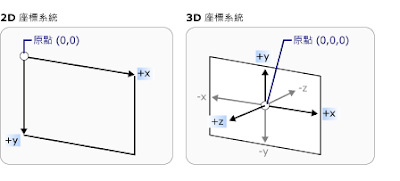
1. 座標系統
圖1 顯示WPF使用的2D和3D座標系, WPF的3D座標系和Direct3D一樣, 是採用右手座標系(OpenGL是使用左手座標系)

[圖 1] 2D和3D座標系統


2. 3D畫布
你可以使用Viewport3D(
投影3D場景的平面)來當作一個3D畫布, 類似2D中Window或Grid.


<Viewport3D>
Children
</Viewport3D>


3. 相機 - Camera
你必須在3D場景中指定相機的位置方向和視野, WPF 提供兩種攝影機, 如下:

a. OrthographicCamera - 垂直投射的攝影機, 它不會因為攝影機的距離而改變尺寸, 適合CAD或2D繪圖

b. PerspectiveCamera - 透視投射的攝影機, 離攝影機越遠的物體, 看起來會縮小和變短, 類似真實世界所看到的影像


另外Camera中還一些參數可設定:
  • Position(攝影機的座標 )
  • LookDirection(攝影機拍攝的方向 )
  • UpDirection(攝影機的法向量 )
  • FiledOfView(攝影機的拍攝角度 , PerspectiveCamera才可以設定)
  • Width(觀景的寬度, OrthographicCamera 才可以設定)
攝影機在XAML的寫法如下所示:


<Viewport3D.Camera>
<PerspectiveCamera x:Name="camera"
Position="0,0,5"
LookDirection="0,0,-10"
UpDirection="0,1,0"
FieldOfView="45" />
</Viewport3D.Camera>


1. 3D模型
- ModelVisual3D

a. Light

如果在3D場景中沒有打光的話, 畫面會是一片黑暗.

WPF提供下面幾種光源, 供使用者使用:

  • AmbientLight(周遭光源, 光線來自四處)
  • DirectionalLight(方向光源, 類似太陽光)
  • PointLight(點光源, 類似燈泡或蠟燭)
  • SpotLight(聚光燈)
下面程式碼(XAML)顯示燈光的使用:

<ModelVisual3D>
<ModelVisual3D.Content>
<DirectionalLight x:Name="light" Direction="-1,-1,-1" Color="White"/>
</ModelVisual3D.Content>
</ModelVisual3D>


b. MeshGeometry3D
WPF是利用
三角形建立來3D模型, 其相關的參數如下:

  • Position(三角形的頂點)
  • TriangleIndices(指定頂點的連接順序)
  • Normals(三角形面的法向量, 可指定正面和反面)
  • TextureCoordinates(指定貼圖座標)
下面的程式碼顯示如何產生一個矩形的平面:


<MeshGeometry3D
Positions="-1 -1 0 1 -1 0 -1 1 0 1 1 0"
Normals="0 0 1 0 0 1 0 0 1 0 0 1"
TextureCoordinates="0 1 1 1 0 0 1 0"
TriangleIndices="0 1 2 1 3 2" />
</GeometryModel3D.Geometry>


c. Material
我們可以為3D模型加上材質, WPF提供下面這些材質來作設定.
  • DiffuseMaterial
  • SpecularMaterial
  • EmissiveMaterial
下列程式碼式碼(XAML)顯示顯示如何使用材質:


<GeometryModel3D.Material>
<DiffuseMaterial>
<DiffuseMaterial.Brush>
<SolidColorBrush Color="Cyan">
</DiffuseMaterial.Brush>
</DiffuseMaterial>
</GeometryModel3D.Material>


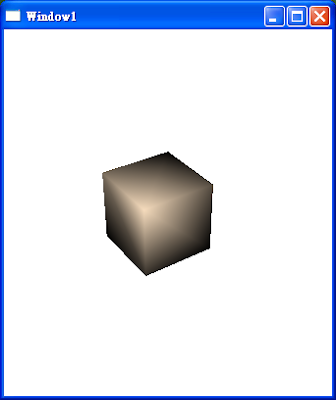
看完上面介紹後, 我們就用XAML寫一個3D Cube. 程式碼如下所示:

<Window x:Class="WPF3DCube.Window1"

xmlns="http://schemas.microsoft.com/winfx/2006/xaml/presentation"

xmlns:x="http://schemas.microsoft.com/winfx/2006/xaml"

Title="Window1" Height="407" Width="342">

<Grid>

<Viewport3D Name="viewport3D1">


<!--Setup Camera-->

<Viewport3D.Camera>

<PerspectiveCamera

x:Name="camera"

Position="6 5 4"

LookDirection="-6 -5 -4"

FieldOfView="30">

</PerspectiveCamera>

</Viewport3D.Camera>


<!--Setup Light-->

<ModelVisual3D>

<ModelVisual3D.Content>

<DirectionalLight x:Name="light"

Direction="-1,-1,-1"

Color="White"/>

</ModelVisual3D.Content>          

</ModelVisual3D>


<ModelVisual3D>

<ModelVisual3D.Content>                  

<GeometryModel3D>


<!--Build 3D Cube-->

<GeometryModel3D.Geometry>

<MeshGeometry3D x:Name="cube"

Positions="0 0 0  1 0 0
0 1 0  1 1 0
0 0 1  1 0 1
0 1 1  1 1 1"

TriangleIndices="2 3 1  2 1 0  7 1 3
7 5 1  6 5 7  6 4 5
6 2 0  2 0 4  2 7 3
2 6 7  0 1 5  0 5 4">

</MeshGeometry3D>                          

</GeometryModel3D.Geometry>                    


<!--Setup Material-->

<GeometryModel3D.Material>                         

<DiffuseMaterial x:Name="matDiffuseMain">

<DiffuseMaterial.Brush>

<SolidColorBrush Color="Bisque"/>

<DiffuseMaterial.Brush>

</DiffuseMaterial>

</GeometryModel3D.Material>


</GeometryModel3D>

</ModelVisual3D.Content>

</ModelVisual3D>

</Viewport3D>

</Grid>
</Window>


其結果如下所示:


[圖 2] 3D Cube

參考文章 :
MSDN - WPF 3D Graphics
CodeProject :
WPF 3D Primer

2009年8月2日 星期日

WPF功能 -2D Transform

WPF提供2D Transform的功能, 可以讓你對控制元件或2D圖形作轉換.

Transform的類別有下面幾種:


RotateTransform(旋轉)
  • Angle - 旋轉角度
  • CenterX - 旋轉中心的X座標
  • CenterY- 旋轉中心的Y座標

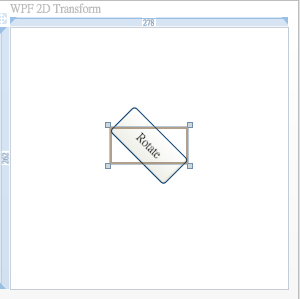
下面的XAML檔示範如何將一個button旋轉45度

<Button Height="37"
Margin="100"
Name="rotateButton"
VerticalAlignment="Top"
Content="Rotate">
<Button.RenderTransform>
<RotateTransform Angle="45">
</RotateTransform>
</Button.RenderTransform>
</Button>


如果將上例改用C#,其程式碼如下所示:

rotateButton.Height = 37;
rotateButton.Margin = new Thickness(100);
rotateButton.VerticalAlignment = VerticalAlignment.Top;
rotateButton.Content = "Rotate";
RotateTransform rotateT = new RotateTransform();
rotateT.Angle = 45;
rotateButton.RenderTransform = rotateT;


[圖1] Rotate Button

在上面範例中, 元件並不是以自己的中心點作旋轉, 因為WPF Transform的原點, 預設是在元件的左上角. 因此, 如果你想繞著物件的中心點作旋轉的話, 可以改變CenterX,CenterY, 或設定RenderTransformOrigin屬性, 不過設定CenterX和CenterY, 必須設定絕對座標, 相對上比較困難. 因此將 RenderTransformOrigin設為相對的(0.5,0.5)比較容易作到. 使用RenderTransformOrigin的XAML檔如下所示


<Button Height="37"
Margin="100"
Name="rotateButton"
VerticalAlignment="Top"
Content="Rotate"
RenterTransformOrigin=".5,.5">
<Button.RenderTransform>
<RotateTransform Angle="45">
</RotateTransform>
</Button.RenderTransform>
</Button>


C#的程式碼如下所示:

rotateButton.Height = 37;
rotateButton.Margin = new Thickness(100);
rotateButton.VerticalAlignment = VerticalAlignment.Top;
rotateButton.Content = "Rotate";
rotateButton.RenderTransformOrigin = new Point(0.5, 0.5);
RotateTransform rotateT = new RotateTransform();
rotateT.Angle = 45;
rotateButton.RenderTransform = rotateT;


[圖2] Rotate Button+RenterTransformOrigin


ScaleTransform(縮放)
  • ScaleX - X軸的縮放比例
  • ScaleY - Y軸的縮放比例
  • CenterX - 縮放中心的X座標
  • CenterY - 縮放中心的Y座標
下面的XAML檔示範如何將一個button放大2倍


<Button Height="37"
Margin="100"
Name="scaleButton"
VerticalAlignment="Top"
Content="Scale"
RenterTransformOrigin=".5,.5">
<Button.RenderTransform>
<ScaleTransform ScaleX="2" ScaleY="2">
</ScaleTransform>
</Button.RenderTransform>
</Button>


[圖 3] ScaleTransform

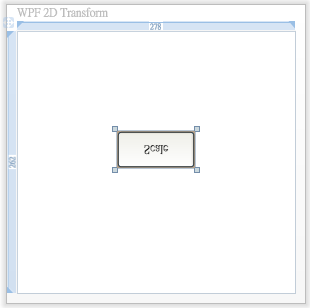
你也可以將ScaleY設為負值, button中的文字就會像倒影, 呈現上下顛倒(reflection). 程式碼如下所示:


<Button Height="37"
Margin="100"
Name="scaleButton"
VerticalAlignment="Top"
Content="Scale"
RenterTransformOrigin=".5,.5">
<Button.RenderTransform>
<ScaleTransform ScaleX="1" ScaleY="-1">
</Scaleransform>
</Button.RenderTransform>
</Button>


[圖 4] 顛倒的button


TranslteTransform(平移)
  • X - 移動的X軸座標
  • Y - 移動的Y軸座標
下面的XAML檔示範如何將一個button往右和下各移動50


<Button Height="37"
Margin="100"
Name="translateButton"
VerticalAlignment="Top"
Content="Translate"
RenterTransformOrigin=".5,.5">
<Button.RenderTransform>
<TranslateTransform X="50" Y="50">
</TranslateTransform>
</Button.RenderTransform>
</Button>


[圖 5] TranslateTransform


SkewTransform(傾斜)

  • AngleX - X軸的傾斜角度
  • AngleY- Y軸的傾斜角度
  • CenterX - 傾斜中心的X座標
  • CenterY - 傾斜中心的Y座標

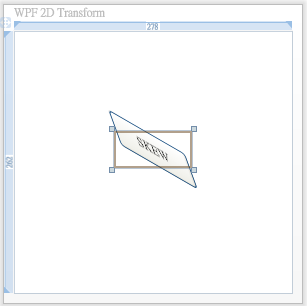
下面的XAML檔示範如何將一個button作傾斜:


<Button Height="37"
Margin="100"
Name="skewButton"
VerticalAlignment="Top"
Content="Skew"
RenterTransformOrigin=".5,.5">
<Button.RenderTransform>
<SkewTransform AngleX="20" AngleY="30">
</SkewTransform>
</Button.RenderTransform>
</Button>


[圖 6] SkewTransform

TransformGroup

若你要同時對一個元件作旋轉,平移和縮放, 可以使用TransformGroup將這些轉換放在一起. 但你必須小心, 使用多重轉換時, 順序非常重要, 例如, 如果先旋轉在平移, 和先平移在作旋轉, 這兩種轉換的最後結果會不一樣.

下面的XAML示範如何使用TransformGroup


<Button Height="37"
Margin="100"
Name="transformButton"
VerticalAlignment="Top"
Content="Group"
RenterTransformOrigin=".5,.5">
<Button.RenderTransform>
<TransformGroup>
<ScaleTransform ScaleX="2">
</ScaleTransform>
<RotateTransform Angle="45">
</RotateTransform>
</TransformGroup>
</Button.RenderTransform>
</Button>


C#的程式碼如下所示


skewButton.Height = 37;
skewButton.Margin = new Thickness(100);
skewButton.VerticalAlignment = VerticalAlignment.Top;
skewButton.Content = "Group";
skewButton.RenderTransformOrigin = new Point(0.5, 0.5);

ScaleTransform scaleT = new ScaleTransform();
scaleT.ScaleX = 2;

RotateTransform rotateT = new RotateTransform();
rotateT.Angle = 45;

TransformGroup transformGroup = new TransformGroup();
transformGroup.Children.Add(scaleT);
transformGroup.Children.Add(rotateT);

skewButton.RenderTransform = transformGroup;


[圖 7] TransformGroup

附註: 除了上述的RenderTransform外, 另外還有一個叫LayoutTransform的轉換. LayoutTransform 會影響到UI配置的結果, 因為它會在UI畫面配置之前作套用, 而RenderTransform是在UI畫面已經配置完後才作套用.